This project was imagined behind my eyeballs for months. I thought of all the positives of the Dropjes that I did last year and all the reasons they DID NOT work.
It went like this:
The size 34 for my friend (see here) was a stretchy cotton with stretchy lining. It was so amazing and cozy. I really need that stretch! I was just figuring out how to bag the lining though so I added some unnecessary facings.
The size 36 for me (see here) was so fluffy, but it was too square. It was too solid. It was unflattering. I did use the size 34 length and that was just barely the right length.
So I thought: I need to have some stretchiness but it needs to be small. Plus I have this stunningly fabulous star print canvas from Miss Matabi's etsy store and I want to do something amazing with it. And THEN I realized that this annoying fragment of stretch silk was a perfect contrasting shade of yellow. And I got thinking: if I made the hem and the side panels from a stretchy knit, and used the stretch silk lining, I would get the stretch that I wanted while being able to use my little piece of star fabric. Also by having a stretchy bottom it might be more fitted. That was my plan.


I had to jigsaw the pattern pieces and cut painstakingly and the hood ended up being in two pieces and on the crossgrain.
I also for the first time EVER actually used topstitching thread. Whoa, it's really thick! And scary! No hiding mistakes here - I think a lighter colour would have been a bit better, or purple, but there wasn't a lot of selection.
I put together the exterior while waiting for my dad to send me the lining, which I stupidly didn't bring with me when I moved. I wanted to get the two parts together before going to Europe so I could make sure to get a good riri zip in Munich. There is a nice shop which will shorten zips and it has a great selection. I also thought just maybe something from my stash would work - the rest of my stash was also still living in Munich. So it didn't quite get done, in terms of the lining being ready, but I did get a few zip options in Munich so I could choose the best one.
Then I got nervous I might mess it up so I dithered by making a bunch of things I didn't care about. It sounds like all I do is sew lately but I promise I do other things too. Luckily after making the Halifax Hoody x2 I was really on top of sewing buttonholes for hood strings and putting in separating zips...
I sewed the hood together before the armholes. Don't do that! I guess the burrito method for the armholes would have been much easier but I did manage and then understitched and topstitched (invisibly.) I ended up going with a lighter weight zip so that it would not get in the way of the beautiful star pattern.
Nothing else shocking on construction. I put some lightweight, slightly stretchy interfacing on the edge of the hood and along the zipper of the silk lining, so that it would be a little stronger where the zipper and the hood string go. I used fusible web when it got to folding the hem and stitching it in the ditch, plus I used way more pins and attention than I think I ever have before. It was necessary because the rib binding is way more stretchy than the body of the vest, and in fact there was a 2cm spot near one side where I didn't catch the hem binding properly and I think I went back over it six times with increasingly bad results, because it kept pleating instead of sewing straight. I needed the support from sewing the entire bottom together otherwise I might have even considered hand stitching that hem up.
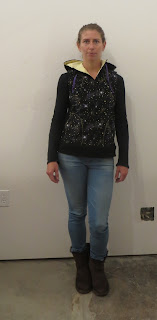
I'm really happy with my vest. It's exactly as I pictured and while it's not quite weather-appropriate I've been finding ways to make it work anyway.
Thanks for Meredith at No Basis in Reality for yet another photo shoot!
It went like this:
The size 34 for my friend (see here) was a stretchy cotton with stretchy lining. It was so amazing and cozy. I really need that stretch! I was just figuring out how to bag the lining though so I added some unnecessary facings.
The size 36 for me (see here) was so fluffy, but it was too square. It was too solid. It was unflattering. I did use the size 34 length and that was just barely the right length.
So I thought: I need to have some stretchiness but it needs to be small. Plus I have this stunningly fabulous star print canvas from Miss Matabi's etsy store and I want to do something amazing with it. And THEN I realized that this annoying fragment of stretch silk was a perfect contrasting shade of yellow. And I got thinking: if I made the hem and the side panels from a stretchy knit, and used the stretch silk lining, I would get the stretch that I wanted while being able to use my little piece of star fabric. Also by having a stretchy bottom it might be more fitted. That was my plan.


 |
| Yes, the lining sticks out just a tiny, I think I didn't snip enough around the bottom of the armhole. But it's just a tiny bit, I both understitched and topstitched |


I had to jigsaw the pattern pieces and cut painstakingly and the hood ended up being in two pieces and on the crossgrain.
I also for the first time EVER actually used topstitching thread. Whoa, it's really thick! And scary! No hiding mistakes here - I think a lighter colour would have been a bit better, or purple, but there wasn't a lot of selection.
I put together the exterior while waiting for my dad to send me the lining, which I stupidly didn't bring with me when I moved. I wanted to get the two parts together before going to Europe so I could make sure to get a good riri zip in Munich. There is a nice shop which will shorten zips and it has a great selection. I also thought just maybe something from my stash would work - the rest of my stash was also still living in Munich. So it didn't quite get done, in terms of the lining being ready, but I did get a few zip options in Munich so I could choose the best one.
Then I got nervous I might mess it up so I dithered by making a bunch of things I didn't care about. It sounds like all I do is sew lately but I promise I do other things too. Luckily after making the Halifax Hoody x2 I was really on top of sewing buttonholes for hood strings and putting in separating zips...
I sewed the hood together before the armholes. Don't do that! I guess the burrito method for the armholes would have been much easier but I did manage and then understitched and topstitched (invisibly.) I ended up going with a lighter weight zip so that it would not get in the way of the beautiful star pattern.
Nothing else shocking on construction. I put some lightweight, slightly stretchy interfacing on the edge of the hood and along the zipper of the silk lining, so that it would be a little stronger where the zipper and the hood string go. I used fusible web when it got to folding the hem and stitching it in the ditch, plus I used way more pins and attention than I think I ever have before. It was necessary because the rib binding is way more stretchy than the body of the vest, and in fact there was a 2cm spot near one side where I didn't catch the hem binding properly and I think I went back over it six times with increasingly bad results, because it kept pleating instead of sewing straight. I needed the support from sewing the entire bottom together otherwise I might have even considered hand stitching that hem up.
I'm really happy with my vest. It's exactly as I pictured and while it's not quite weather-appropriate I've been finding ways to make it work anyway.
Thanks for Meredith at No Basis in Reality for yet another photo shoot!
that looks great - might be my favorite of things you have made. the yellow lining is perfect with the fabric.
ReplyDeletethanks Beth! I think it's one of the few projects that came out exactly as envisioned.
Delete